5 Steps To Increase Your Online Sales With Attractive Product Pictures.
How To Increase Sales By Publishing Good Product Pictures To Your On-line Store.
Opening an online store can be a fantastic way to run a business most especially for young entrepreneurs in Africa. There’s no shop rent to pay, no electric bill to pay or staff to hire and you can enjoy making sales 24 hours a day. Plus, unlike a brick and mortar shop, having an online store lets you sell your products to wide range of customers across the country and the world at large.
But sometimes, it doesn’t stop at owning an online store because even the most beautiful online store just doesn’t seem to bring in money. This can happen due to so many factors but in this article we shall make more emphasis on product pictures.
First impressions are everything when it comes to online business, online shoppers rely more on the visuals and details they find on a product page to make a decision either to click the BUY button or dump your product page and move on, unlike a brick and mortar shop where they have the opportunity to feel the product and ask questions from the seller of the product.
Online shoppers seek time-saving shortcuts all the time, and their attention naturally gravitates to the quickest way to gather information: Pictures.
Product pictures not only testify to the quality of your product, but also serve as windows into your online store, creating 2 very important things:
- Transparency
- Trust
When online shoppers view your product page, they are looking for proof of quality and value.
Pictures shape their first impression, creating a tipping point as to whether they will continue browsing your store and eventually make a purchase.
Here, we’ll show you how to take images that:
- Engage
- Convert
- Boost the lifetime value of your customers.
We’ll also go over how to optimize the picture creation process to save you time and money.
Keep in mind that you don’t need a large budget to create polished and professional product pictures for your online store.
About Product Photography:
Product photography uses specific techniques to showcases products in an attractive way and entices potential buyers to purchase specific products.
Product photography is an essential part of both online and offline advertising for successful catalogues, brochures, magazine ads, billboards, online ads and online store owners, specifically when selling products direct to consumer.
Now that you know why product pictures play a great role in your online store conversion rate, let’s dive into the basic product photography equipment and process.
For those new to photography, your first product shoot may seem overwhelming.
But after a few rounds, each step will become more natural, and you won’t even have to think about it.
The key is to find a process that suits your needs, optimize it, and create a set of guidelines to ensure you keep your images consistent.
Let’s take a look at some product photography tips.
- Set up your background and product.
Getting the right background is worth the effort, because it simplifies the entire editing process if needed it also gives your entire store images a decent and professional look, unlike when you have different color background pictures on your store.
Use a white or light backdrop, as it’s easy to remove when retouching your images.
There are lots of ways you can improvise a background. However, we will look at one that can be set up with little to no cash.
- A shooting table: You can create this with a chair you have in your home or office/shop
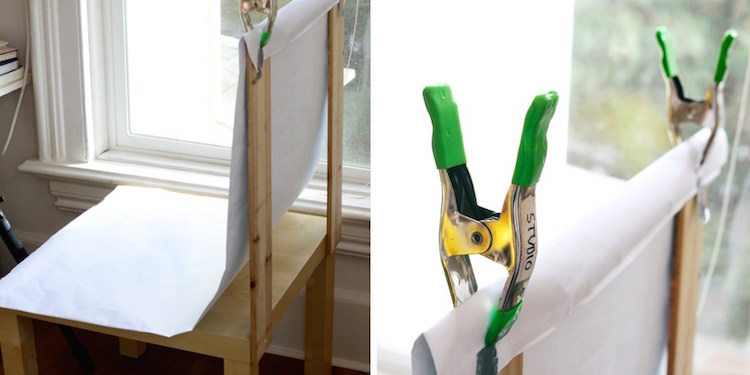
Chair mounted sweep: For this, all you need is a roll of craft paper.
The simplest way to achieve this is by pushing a chair against a wall and taping craft paper on the wall allowing it naturally fall to the ground, creating a seamless transition between the vertical to horizontal plane.
Or you can clip the paper to the top of the chair to improvise a stand for your sweep like the image above.
Setting up your Product:
It’s important to make sure you set your product up in front of your background on a flat, stable surface.
Once you get the lighting right, you’re almost ready to shoot.
If you’re shooting jewelry, it’s always best to use a bust. Those on a budget can improvise by making one from a piece of cardboard, like in the image below.
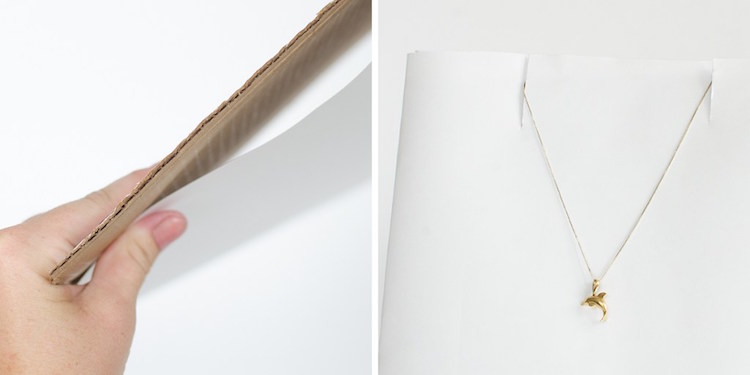
You can also use fishing line to suspend earrings and other small items, which is easily removed in the editing process.
Here are a few ideas for harder to photograph items:
- Use glue dots and tape to fix small items in place.
- For clothing, it’s always best to use a mannequin, which can be easily removed.
- You could try experimenting with a hanger or even creative flat lay.
- For lifestyle shots, why not ask a friend or team member to sport your clothes for some bonus photos.
If you are shooting large items, like furniture, you will need a stand mounted sweep that might cost a little more.
But you can improvise by getting a few rolls of craft paper, taping them to the wall, and letting gravity do all the work.
This technique follows the same principles as the table mounted sweep, only it’s a bit bigger.
- Get your lighting right.
If there is one deciding factor that defines the quality of your images, it’s light.
Lighting can be very tedious to set up, but when done right, it brings beautiful results and significantly simplifies your post-processing.
If you are on a tight budget and you don’t want to spend much on lighting, your best bet is making use of Natural light and a good smart phone with high camera pixel.
Start by placing your shooting table near a large window, ideally one that allows lots of light into the room.
If the light is too harsh, you can diffuse it by placing a cloth or white paper over the window covering some of the upper section of the window so that light can still hit the product.
If the shadows are too harsh, use white plasterboard or cardboard on either side of the object, helping to reflect some light and soften it. It’s always best to shoot when the day is at its brightest, giving you more light to play with.
Better to have too much sunlight and minimize it, than not enough.
It’s very hard to create great lighting during the editing process.
But keep in mind never to shoot under direct sunlight. Just like a strong backlight, direct light can create harsh shadows.
- Use a tripod.
Tripods bring consistency, stability, and focus.
It is easy to end up with blurry images when you try to get your entire product in focus, while holding your camera in your hand without moving.
If you can’t fit a tripod into your budget, use a pile of books or a stool to keep your camera fixed.
- Pick the right camera.
It is the most essential element to any product photography shoot. Purchasing a good DXLR camera is a nice idea but If you are on a tight budget, you can use your smart phone like I made mention above, just make sure it has good camera pixel that can produce nice picture quality.
- Don’t forget post-processing.
Editing your images after the shoot is vital to achieving a polished and professional look. it doesn’t matter if you shoot your product with a smart phone camera or a professional DSLR camera, editing your final shoots can make a huge difference between mediocre and professional results.
For those starting out, getting the background or the lighting right can be a trial and error process.
Thankfully photo editing can make a multitude of flaws magically disappear.
Editing covers anything from background removal to color correction, mannequin removal, and shadow addition for a more natural look.
Photo editing is a time-consuming process, especially until you get the hang of things but it’s really worth the process as it guarantees you of high conversion rate.
Luckily, there are many free image editing tools available to help with all your photo editing needs.
Examples of Free Image Editing Tools:
- Pixlr – Free and has a lot of the functionality of Photoshop.
- Canva – User-friendly free online editor best suited for marketing materials.
- Fotor – Free, easy-to-use smartphone app.
- Snapseed – Powerful, fully-featured mobile app that is also free.
LET PROFESSIONALS DO IT FOR YOU:
For those who don’t have time or perhaps don’t want the hassle, you can opt to use one of our value added services which is designed to make your life easier, you also don’t have to worry about all the processes involved in taking good pictures and uploading them to your online store.
We have professionals dedicated to ensure you get high quality pictures for all your products and they will help you publish them to your online store.
What does this service entails?
- Our professional photographer schedule a time with you.
- They come to your store for the photography section of your products,
- They do the post production editing
- They help you publish each and every product to your Vendorfy Store.
To learn more about this service, please CLICK HERE.
For more tips on how to write a good product description, check out our Complete Guide To Writing A Winning Product Description

Adetola Adele is the head team leader at Vendorfy a subsidiary of GoPanta Media. He is a highly motivated, entrepreneurial minded and result oriented self starter with the focus on Ecommerce as the next big thing in Africa.